Download the RubiQ Configurator
RubiQ comes pre-configured and almost-ready-to-fly. These settings must be verified and can be customized using the RubiQ Configurator, an open source flight controller software for Windows and macOS.
RubiQ’s that come with the Taranis X9 Lite radio controllers are only compatible with the RubiQ Configurator, which must be downloaded directly from https://rubiq.edventures.com/file-downloads/. The INAV Configurator is incompatible with the latest RubiQ models.
There are two sets of instructions below: one for computers running Windows and one for macOS. Please use the set of instructions appropriate for your operating system.
Windows Version:
- Download the RubiQ Configurator Windows Version.zip file from rubiq.edventures.com/file-downloads/, under the Configurator Downloads tab.
- Navigate to the downloads folder of your computer, or the folder to which your downloaded content is typically sent.
- Find the downloaded ZIP file titled RubiQ Configurator Windows Version.zip. Right-click the zipped folder icon and select “extract all.” This will bring up a sub-menu asking you to select a destination for the extracted files. Check the box that says “show extracted files when complete,” then press the “extract” button at the bottom.
- A new file window will appear with a folder containing a folder titled “RubiQ Executeable” click on this folder to access the component files for the configurator.
- Right-click on the file titled “RubiQ-configurator.”
- Select the option “Pin to taskbar.”
- The RubiQ Configurator icon will now appear on your taskbar.
- Click the icon to open the Configurator.
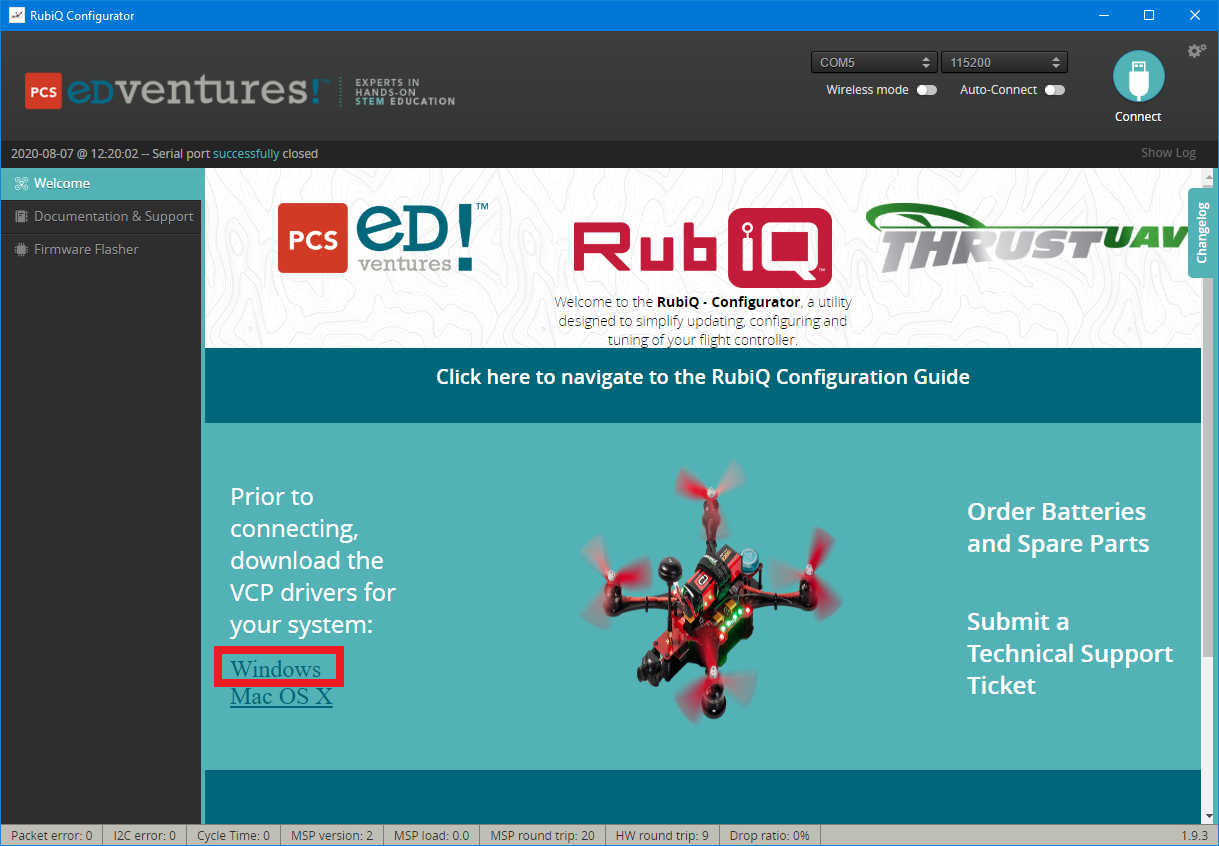
- It is essential that you download VCP drivers, which facilitate the connection between RubiQ and your computer’s ports. Download these directly by clicking the Windows link on the opening screen of the RubiQ Configurator. This will download a .zip file of the drivers.
- When the download is complete, right-click the file and select “open,” this will bring up a sub-menu showing you the zipped files. Click the “extract all” icon to select a destination for the extracted files.
- Press the “extract” option at the bottom. From there a new file window will appear containing multiple files.
- Select the application file called CP210xVCPInstaller_x64 for 64-bit operating systems. If you have a 32-bit operating system, please select the application file called CP210xVCPInstaller_x86. (To determine if your PC is utilizing a 32 or 64-bit operating system, open your Control Panel > System > and look for the line item System Type. This will dictate if you are using a 32 or 64-bit OS.)
- Proceed through the onscreen prompts and various windows until the installation is complete.
- Once you’ve downloaded, unzipped and installed the driver, restart your computer. You will now be able to connect your drone to your computer using the rubiQ Configurator by using the USB cable included with your drone. Once you’ve established the cable connection, click on the RubiQ icon on the task bar to open the configurator. Next, you’ll connect RubiQ to the RubiQ Configurator.
macOS Version:
- Download the RubiQ Configurator macOS Version.zip file from rubiq.edventures.com/file-downloads/, under the Configurator Downloads tab. When you see a message saying “Google Drive can’t scan this file for viruses”, click Download anyway.
- Navigate to the downloads folder of your computer, or the folder to which your downloaded content is typically sent.
- Find the downloaded ZIP file titled RubiQ Configurator macOS Version.zip. Double-click on the zipped folder icon.This will open up an application titled “inav-configurator-1.9.3”.
- Double-click on the application icon. This will open up a warning saying “’inav-configurator-1.9.3’ cannot be opened because the developer cannot be verified.” Click Cancel.
- Open your System Settings and navigate to Privacy & Security.
- Scroll down to the Security section. Where there is a message saying “inav-configurator-1.9.3″ was blocked from use because it is not from an identified developer”, click Open Anyway.
- This will open a message saying “macOS cannot verify the developer of “inav-configurator-1.9.3”. Are you sure you want to open it?”. Click Open.
- With the application open, right-click on the icon in the Dock. Go to Options and select Keep in Dock or Show in Finder.
- The RubiQ Configurator icon will now appear in your Dock or Finder.
- It is essential that you download VCP drivers, which facilitate the connection between RubiQ and your computer’s ports. Download these directly by clicking the macOS link on the opening screen of the RubiQ Configurator. This will download a .zip file of the drivers.
- When the download is complete, double-click the file to extract all. This will bring up a new folder called “macos_vcp_driver”.
- Double-click the folder to open, then double-click SiLabsUSBDriverDisk.dmg.
- This will open the Silicon Labs VCP Driver Install Disk. Double-click “Install CP210x VCP Driver” and proceed through the onscreen prompts and various windows until the installation is complete.
- Once you’ve downloaded, unzipped and installed the driver, restart your computer. You will now be able to connect your drone to your computer using the RubiQ Configurator by using the USB cable included with your drone. Once you’ve established the cable connection, click on the icon to open the configurator. Next, you’ll connect RubiQ to the RubiQ Configurator.